I was trying to get SpecFlow to build under Mac OS and had some problems with an MSBuild target (https://github.com/techtalk/SpecFlow/blob/master/Tests/TechTalk.SpecFlow.Specs/.build/build.targets#L32).
We need to replace some text in a file with a value which we only can access during build. For that we used the RoslynCodeTaskFactory. This has the benefit, of not having to write a whole MSBuild task. But I had problems that msbuild or dotnet build wasn’t able to find the Microsoft.Build.Tasks.Core.dll.
So I decided to write a new MSBuild task anyway.
But this post is not about writing the n-th MSBuild task, but about that I was able to write it, create a NuGet package for it, have a continues build with automatic deployment to NuGet.org. And I was able to do it in less than 8 hours (and on a Mac).
You can find the whole sources here.
Writing the MSBuild task
Writing a MSBuild task is not hard. You need to reference Microsoft.Build.Framework and Microsoft.Build.Utilities.Core in your project. In your class you have to implement the Task abstract class https://github.com/SabotageAndi/MSBuild.AdditionalTasks/blob/master/src/MSBuild.AdditionalTasks/Tasks/ReplaceTextInFile/ReplaceTextInFileTask.cs#L8. In the Execute- method you implement your task.
And done!
Creating a NuGet package for the MSBuild task to redistribute it
Thanks to the sdk- style project system, for most of the time when you create a NuGet package, a nuspec- file is not needed anymore. Everything can be specified in the project file.
Packaging a MSBuild task is a little bit different than normal libraries. You have to put the assembly into the tasks folder and not in the standard lib folder. And then you need additional MSBuild files to register your task into MSBuild (https://github.com/SabotageAndi/MSBuild.AdditionalTasks/tree/master/src/MSBuild.AdditionalTasks/build). Thanks to Nate McMaster who wrote a blog post about packaging MSBuild tasks (https://natemcmaster.com/blog/2017/07/05/msbuild-task-in-nuget/).
What has changed since he published his article, is that NuGet.org now wants a license included in the package. For that you need to specify in which file the license is (https://github.com/SabotageAndi/MSBuild.AdditionalTasks/blob/master/src/MSBuild.AdditionalTasks/MSBuild.AdditionalTasks.csproj#L22) and package the license file into your package (https://github.com/SabotageAndi/MSBuild.AdditionalTasks/blob/master/src/MSBuild.AdditionalTasks/MSBuild.AdditionalTasks.csproj#L35).
To make it easier in the build pipeline to put the generated NuGet package into the build artifacts, I configured the output folder for packages to be outside of the project (https://github.com/SabotageAndi/MSBuild.AdditionalTasks/blob/master/src/MSBuild.AdditionalTasks/MSBuild.AdditionalTasks.csproj#L31). This makes it also easier to use the generated package in a test/sample project.
Additionally I enabled GeneratePackageOnBuild so that the NuGet package is generated everytime the project is build (https://github.com/SabotageAndi/MSBuild.AdditionalTasks/blob/master/src/MSBuild.AdditionalTasks/MSBuild.AdditionalTasks.csproj#L30).
To check if everything was correct in the NuGet package, I uploaded it manually to NuGet.org. That’s were I got the notice that I have to add the license into the package. ;-)
Continue Build
I love Azure Pipelines. And since they provide 10 free unlimited hosted build agents for Open Source project (https://azure.microsoft.com/en-us/blog/announcing-azure-pipelines-with-unlimited-ci-cd-minutes-for-open-source/), it’s better than before (limit to 300 min per month). And they have hosted build agents for Windows and Mac OS.
You can use the web UI to define your build pipeline or you can do it per yaml (https://docs.microsoft.com/en-us/azure/devops/pipelines/get-started-yaml?view=azure-devops). Yaml has the benefit, that you can define the same pipeline and run it as jobs on different agent pools.
Azure Pipeline definition: https://github.com/SabotageAndi/MSBuild.AdditionalTasks/blob/master/azure-pipelines.yml Job definition: https://github.com/SabotageAndi/MSBuild.AdditionalTasks/blob/master/build.yml
Build status: https://sabotageandi.visualstudio.com/MSBuild.AdditionalTasks/_build?definitionId=6
The part where I struggled the most was to find the right path for the PublishBuildArtifact task (https://github.com/SabotageAndi/MSBuild.AdditionalTasks/blob/master/build.yml#L58). At the end the problem was, that I specified a file pattern. Looks like that doesn’t work with the task.
Deploy it to NuGet.org
With now a working build pipeline, I created a new release pipeline that takes the artifact and uploads the nupkgs- files to NuGet.org. As of writing this article, only the UI is available to define release pipelines.
Release pipeline
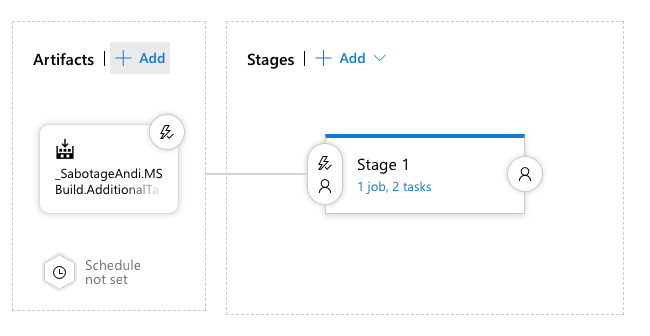
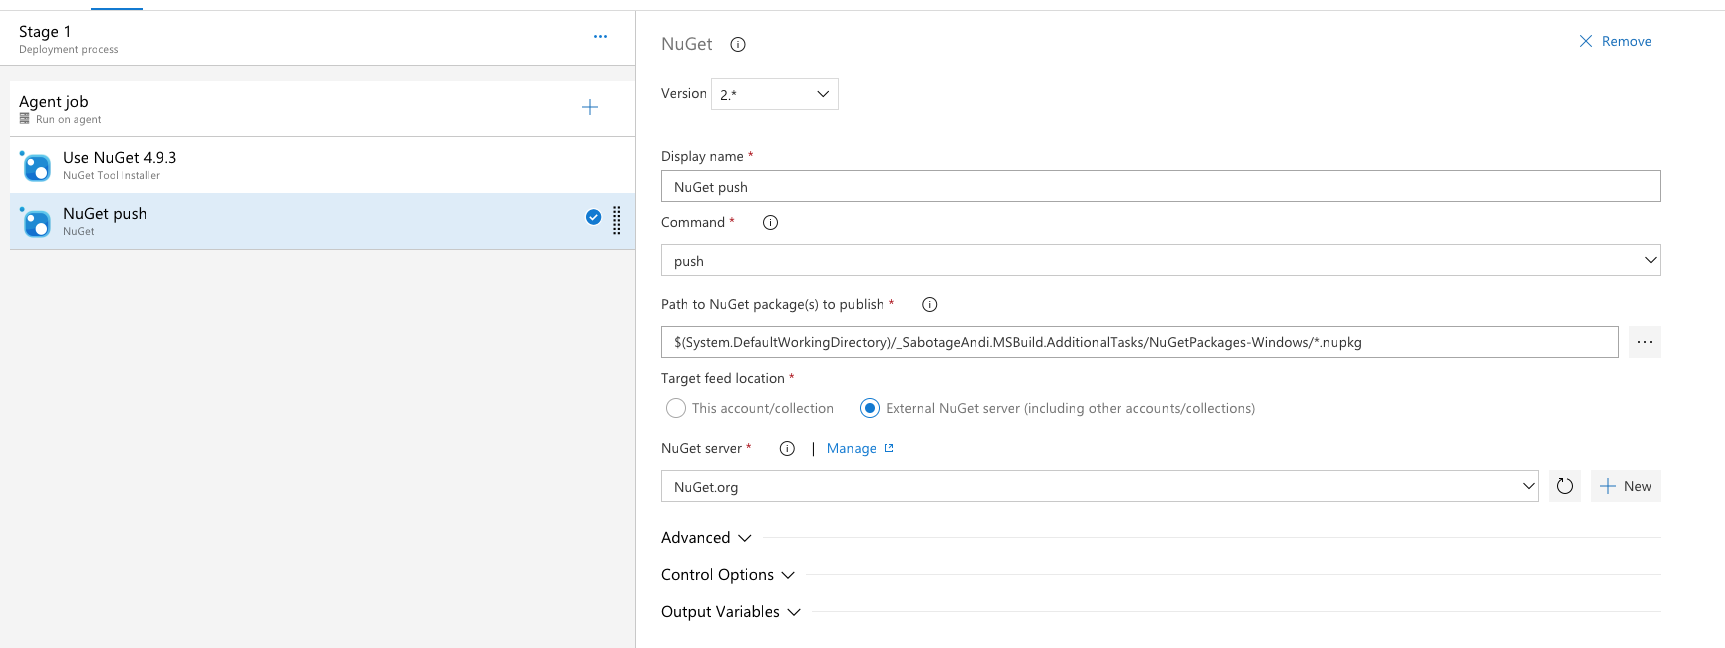
Release pipeline detail
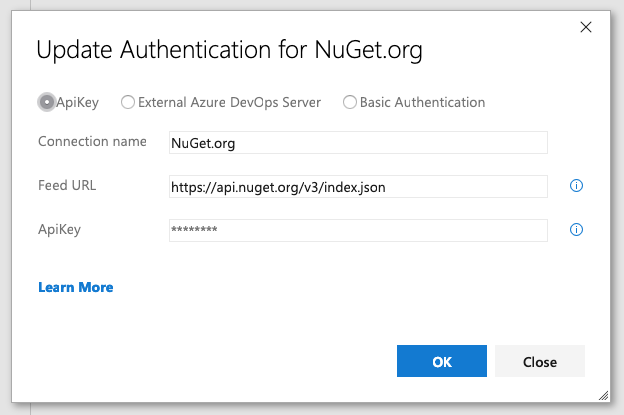
The “hardest” part was to create the service connection with NuGet.org. For that, you need an API key for your account. The steps for that are documented here.
When you have it, you can create a NuGet service connection in Azure Pipelines.
This service reference has to be used in the NuGet task. And after specifing the correct path where the NuGet packages are (yes, again pathes are hard).
And that’s it. At the second run of the release pipeline, a new version of NuGet package was uploaded to NuGet.org. Yeah!
Problems on the way
Building on different platforms
I wanted to have one way to build the task on Windows and Mac OS. I choose PowerShell, because it is available on Mac OS and Windows.
To build I used dotnet build and so I don’t have to find msbuild on my system (MacOS: in PATH, Windows: search via vswhere.exe). But because I build the sample/test in the same script, the NuGet- package gets cached in the local package cache. So I need to delete the cached files before the build.
Obvious dependend on the OS, there are different ways to get the folder. In this case, a simple check if an environment variable exists ($HOME for Mac OS) https://github.com/SabotageAndi/MSBuild.AdditionalTasks/blob/master/build_and_tests.ps1#L7.
As we got the folder, removing it is easy, if you know PowerShell (I didn’t, now I do a little bit more).
Conclusion
It’s facinating how easy this stuff got in the last years. Some years ago doing this all was work of multiple days. Now I was able to do it in some hours. And the most part of the time I spend on the build PowerShell script.
So I think I should learn PowerShell. :-)